

Showing posts with label Paper Blossoms. Show all posts
Showing posts with label Paper Blossoms. Show all posts
Friday, March 2, 2012
Friday, January 27, 2012
Be My Valentine
Designed by Elisa Kammerdiener

McGill Paper Punches:
-64503 Paper Blossoms Floral Petals
-64502 Paper Blossoms Birch Leaf
-64500 Paper Blossoms Alpine Snowflake
-65800R Tool Kit
-65900R Molding Mat
Additional Supplies:
-Bazzill Smoothie Cardstock
-Kraft Cardstock
-Pink Paislee Pattern Paper
-PurpleCows wax and melt it tool.
-A Jillian Vance Design Stamp
-Pebbles Inc. Rub-ons
-Queen and Company pearls
-Paper Doilie
-VersaMagic Creamy Brown Ink
Creating the Floral rose
 Click for full printable pdf
Card Instructions:
Trim cardstock to 8.5"x5.5" Fold in half to create card base.
Trim Pattern paper to 5.25"x4". Adhere to card front.
Ink doilie. Adhere to center of card
Create Rose per Floral Rose instructions. Brush on red wax using the melt it. When rose is created adhere it to center of die cut.
Create a banner with a scrap piece of cardstock. Stamp sentiment. Adhere to card.
Embellish with 2 Queen and company pearls.
As Always we would love to see what you are creating with any of our McGill Paper Punches so be sure to leave us a comment with a direct link to your project.
Till next time, Happy Crafting
McGill Paper Punches:
-64503 Paper Blossoms Floral Petals
-64502 Paper Blossoms Birch Leaf
-64500 Paper Blossoms Alpine Snowflake
-65800R Tool Kit
-65900R Molding Mat
Additional Supplies:
-Bazzill Smoothie Cardstock
-Kraft Cardstock
-Pink Paislee Pattern Paper
-PurpleCows wax and melt it tool.
-A Jillian Vance Design Stamp
-Pebbles Inc. Rub-ons
-Queen and Company pearls
-Paper Doilie
-VersaMagic Creamy Brown Ink
Creating the Floral rose
Card Instructions:
Trim cardstock to 8.5"x5.5" Fold in half to create card base.
Trim Pattern paper to 5.25"x4". Adhere to card front.
Ink doilie. Adhere to center of card
Create Rose per Floral Rose instructions. Brush on red wax using the melt it. When rose is created adhere it to center of die cut.
Create a banner with a scrap piece of cardstock. Stamp sentiment. Adhere to card.
Embellish with 2 Queen and company pearls.
As Always we would love to see what you are creating with any of our McGill Paper Punches so be sure to leave us a comment with a direct link to your project.
Till next time, Happy Crafting
Wednesday, January 25, 2012
Carnations in a Vase
designed by Sheri Willshire

McGill Paper Punches:

McGill Paper Punches:
-Various shades of pink card stock
-Various shades pink ink (or coloring the edges of each petal)
-Pink Seam Binding
-Pink Acrylic Paint
-Mercury Glass Vase
-3" Styrofoam Ball
-Beacon's Fabric Tac
-Beacon's 3 in 1 Adhesive
Click for full printable PDF
Project Instructions:
- Paint Styrofoam ball with pink acrylic paint. Allow to dry. Place into the vase.
- Using Beacon's 3 in 1 Adhesive adhere the McGill Carnations onto the Styrofoam ball.
- Tie a length of pink seam binding around the vase.
Here is a closeup of the Carnations

We'll be back soon with more Paper Blossom projects and other projects using the complete line of McGill Paper Punches.
Sign up to follow us on the blog and or like us on facebook so you don't miss out on the blog posts, updates, prizes etc.
Monday, January 23, 2012
Floral Bib Necklace
designed by Jessica Morales

McGill Paper Punches:
-64004 Buttercup Paper Blossom Punch
-64533 Sun Paper Blossom Punch
-64534 Grape Leaf Paper Blossom Punch
-65800 Tool Kit
-65900 Molding Mat
Additional Supplies:
-Bazzill Cardstock
-Felt
-Burlap
-German Glass
-Gold Micro Beads
-Seam Binding
-Eyelets
-Beacon Fabri-Tac
Project Instructions:
Sign up to follow us on the blog and or like us on facebook so you don't miss out on the blog posts, updates, prizes etc.

McGill Paper Punches:
-64004 Buttercup Paper Blossom Punch
-64533 Sun Paper Blossom Punch
-64534 Grape Leaf Paper Blossom Punch
-65800 Tool Kit
-65900 Molding Mat
Additional Supplies:
-Bazzill Cardstock
-Felt
-Burlap
-German Glass
-Gold Micro Beads
-Seam Binding
-Eyelets
-Beacon Fabri-Tac
Project Instructions:
- Cut felt and burlap in a semi circle shape to create the base for the bib.
- Attach eyelets on the upper left and right of the burlap and felt base.
- Punch out several flowers and leaves from different color papers. Assemble flowers as shown above.
- Apply glue to the center of each flower, Sprinkle a fair amount of micro beads to each one.
- Spread adhesive one flowers and leaves as desired and sprinkle on German Glass.
- Glue flowers and leaves to felt and burlap base.
- Pull desired amount of seam binding through each eyelet depending on how long you want your bib necklace. Tie around your neck and your ready to show it off.
We'll be back soon with more Paper Blossom projects and other projects using the complete line of McGill Paper Punches.
Sign up to follow us on the blog and or like us on facebook so you don't miss out on the blog posts, updates, prizes etc.
Friday, January 20, 2012
Adore Frame
designed by Elisa Kammerdiener

McGill Paper Punches:
-64002 Floriano Paper Blossom Punch
-64511 Star Lily Paper Blossom Punch
-64535 Highland Snowflake Paper Blossom Punch
-65800 Tool Kit
-65900 Molding Mat
Additional Supplies:
-Frame
-Jenni Bowlin Mini Adore Bingo Card
-Pink Vellum
-Bazzill Cardstock
-Purple Cows Decal Edge blade (use in trimmer or freestyle mouse)
-Beacon Fabri-Tac
Creating the Carnation:
click for full printable PDF
Here is a closeup of the carnation...

Project Instructions:
Create your carnation as instructed above.
Trim a piece of cardstock to fit the size of the window in the frame.
Adhere mini bingo card to the center of the cardstock. Slide into the window and center it.
Adhere your carnation to the bingo card.
You can use any frames new and old. Alter your frame with paint, paper etc before you start building your pieces to fit into the window.
Here is another photo for you...

Sign up to follow us on the blog and or like us on facebook so you don't miss out on the blog posts, updates, prizes etc.

McGill Paper Punches:
-64002 Floriano Paper Blossom Punch
-64511 Star Lily Paper Blossom Punch
-64535 Highland Snowflake Paper Blossom Punch
-65800 Tool Kit
-65900 Molding Mat
Additional Supplies:
-Frame
-Jenni Bowlin Mini Adore Bingo Card
-Pink Vellum
-Bazzill Cardstock
-Purple Cows Decal Edge blade (use in trimmer or freestyle mouse)
-Beacon Fabri-Tac
Creating the Carnation:
Here is a closeup of the carnation...

Project Instructions:
Create your carnation as instructed above.
Trim a piece of cardstock to fit the size of the window in the frame.
Adhere mini bingo card to the center of the cardstock. Slide into the window and center it.
Adhere your carnation to the bingo card.
You can use any frames new and old. Alter your frame with paint, paper etc before you start building your pieces to fit into the window.
Here is another photo for you...

We'll be back soon with more Paper Blossom projects and other projects using the complete line of McGill Paper Punches.
Sign up to follow us on the blog and or like us on facebook so you don't miss out on the blog posts, updates, prizes etc.
Friday, January 13, 2012
Tiger Lily Frame
designed by Elisa Kammerdiener

McGill Punches:
Additional Supplies:
-Core'dinations Cardstock
-Brown Marker
-Seam Binding
-Glue Dots Glue Lines
-Beacon Fabri-Tac
-Frame
Creating the Lily:

To create a Tiger Lily from the Lily all you have to do is add some small dots to your flower. I recommend doing this before you mold the petals.
Once your done creating your Tiger Lilies just place them on your frame where ever you want them to be. Add some seam binding or ribbon and it's ready for a gift. If you have older frames and want to re-purpose them this is a great way to add that extra touch to an old frame.

McGill Punches:
Additional Supplies:
-Core'dinations Cardstock
-Brown Marker
-Seam Binding
-Glue Dots Glue Lines
-Beacon Fabri-Tac
-Frame
Creating the Lily:
Click for full size pdf
To create a Tiger Lily from the Lily all you have to do is add some small dots to your flower. I recommend doing this before you mold the petals.
Once your done creating your Tiger Lilies just place them on your frame where ever you want them to be. Add some seam binding or ribbon and it's ready for a gift. If you have older frames and want to re-purpose them this is a great way to add that extra touch to an old frame.
Tuesday, January 10, 2012
January Flower of The Month
This month we are all about the Carnation
To get you started on creating a dimensional Carnation, Valerie Brincheck has designed this gorgeous Gift Box featuring the Carnation and of course we have the complete supply list and step by step instructions for you.
 McGill Paper Punches:
-64002 Floriano Paper Blossom Punch
-64511 Star Lily Paper Blossom Punch
-64535 Highland Snowflake Paper Blossom Punch
-65800 Tool Kit
-65900 Molding Mat
Additional Supplies:
-Bo-Bunny Wasbi Dots Cardstock
-Bazzill Cardstock
-Acrylic Paint (black and lime)
-Brocade Ribbon (Michaels)
-Flower Soft (Polar White)
-Tim Holtz Distress Ink (Aged Mahogany and Peeled Paint)
-Ranger Inking Tool
-4" round Paper Mache' Box
-Floracraft 1 1/2" Styrofoam Balls
Creating the Carnation:
click for full printable PDF
Here is a close up of the Carnations...

Project Instructions:
 click for full printable PDF
Here is another photo of the completed project...

Sign up to follow us on the blog and or like us on facebook so you don't miss out on the blog posts, updates, prizes etc.
To get you started on creating a dimensional Carnation, Valerie Brincheck has designed this gorgeous Gift Box featuring the Carnation and of course we have the complete supply list and step by step instructions for you.

-64002 Floriano Paper Blossom Punch
-64511 Star Lily Paper Blossom Punch
-64535 Highland Snowflake Paper Blossom Punch
-65800 Tool Kit
-65900 Molding Mat
Additional Supplies:
-Bo-Bunny Wasbi Dots Cardstock
-Bazzill Cardstock
-Acrylic Paint (black and lime)
-Brocade Ribbon (Michaels)
-Flower Soft (Polar White)
-Tim Holtz Distress Ink (Aged Mahogany and Peeled Paint)
-Ranger Inking Tool
-4" round Paper Mache' Box
-Floracraft 1 1/2" Styrofoam Balls
Creating the Carnation:
Here is a close up of the Carnations...

Project Instructions:
Here is another photo of the completed project...

We'll be back soon with more Paper Blossom projects and other projects using the complete line of McGill Paper Punches.
Sign up to follow us on the blog and or like us on facebook so you don't miss out on the blog posts, updates, prizes etc.
Tuesday, January 3, 2012
Sent with Love Card and Envelope plus A Winner
designed by Jessica Morales

McGill Paper Punches:
-64503 Floral Petals Punch
-64500 Alpine Snowflake Punch
-64502 Birch Leaf Punch
-53700 5/16" Round Punchline Punch
-65800 Tool Kit
-65900 Craft Molding Mat
Additional Supplies:
-Bazzill Cardstock
-Kraft Cardstock
-KinderStampO Stamps
-Tim Holtz Distress Inks
-Seam Binding
-Wilton Doily
-KinderStampO Butterfly Charm
-Envelope
-Burlap
-Beacon's 3 - 1 Adhesive
-Beacon's Fabric Tax
Creating the Pansy:
 Click for full Printable PDF
Now on to the winner of the Holiday Album Kit....
 glenda said...What a great word album! I would so love to try it!! Thanks for the chance to win...

McGill Paper Punches:
-64503 Floral Petals Punch
-64500 Alpine Snowflake Punch
-64502 Birch Leaf Punch
-53700 5/16" Round Punchline Punch
-65800 Tool Kit
-65900 Craft Molding Mat
Additional Supplies:
-Bazzill Cardstock
-Kraft Cardstock
-KinderStampO Stamps
-Tim Holtz Distress Inks
-Seam Binding
-Wilton Doily
-KinderStampO Butterfly Charm
-Envelope
-Burlap
-Beacon's 3 - 1 Adhesive
-Beacon's Fabric Tax
Creating the Pansy:
Now on to the winner of the Holiday Album Kit....
glenda said...What a great word album! I would so love to try it!! Thanks for the chance to win...Wednesday, December 28, 2011
Simple Thank You Card
designed by Sheri Willshire

McGill Paper Punches:
-64002 Floriano
-64005 Starflower
-64512 Starburst
-64502 Birch Leaf
-95917L Fancy Square Stacking Punch
-95901 1.5 Square Stacking Punch
-65800 Tool Kit
-65900 Craft Molding Mat
Additional Supplies:
-My Minds Eye Six By Six Happier 6 x 6 Paper Pad
-Cream Cardstock
-Peach Cardstock
-Green Card Stock
-Papertrey Ink Inside Out Thank You
-Beacon's 3 - 1 Adhesive
-Beacon's Fabric Tax
Creating the Azalea:

Project Instructions:
We'll be back with more Paper Blossom Poinsettia's and other Holiday projects using the complete line of McGill Paper Punches.
Sign up to follow us on the blog and or like us on facebook so you don't miss out on the blog posts, updates, prizes etc.

McGill Paper Punches:
-64002 Floriano
-64005 Starflower
-64512 Starburst
-64502 Birch Leaf
-95917L Fancy Square Stacking Punch
-95901 1.5 Square Stacking Punch
-65800 Tool Kit
-65900 Craft Molding Mat
Additional Supplies:
-My Minds Eye Six By Six Happier 6 x 6 Paper Pad
-Cream Cardstock
-Peach Cardstock
-Green Card Stock
-Papertrey Ink Inside Out Thank You
-Beacon's 3 - 1 Adhesive
-Beacon's Fabric Tax
Creating the Azalea:
Click photo for full printable pdf
Project Instructions:
- Create Azalea with the instructions above. Once done set it aside
- Trim cream cardstock to 11" x 4 1/4". Score at 5 1/2 and fold.
- Cut patterned paper to 5 1/4" x 4". Adhere to card base.
- Cut a coordinating piece of patterned paper to 3" x 4". Adhere to the bottom half of the first patterned paper.
- With the Fancy Square Punch, punch an additional piece of coordinating patterned paper and adhere to the middle of the card front
- On a strip of coordinating patterned paper, stamp sentiment and punch one end of the strip in a flag shape with square punch. Adhere to the center of the Fancy Square shape
- Embellish with a McGill Azalea.
Be sure to leave a comment on every post this week to be entered in a drawing for our Holiday Album Giveaway. See HERE for more info...
We'll be back with more Paper Blossom Poinsettia's and other Holiday projects using the complete line of McGill Paper Punches.
Sign up to follow us on the blog and or like us on facebook so you don't miss out on the blog posts, updates, prizes etc.
Wednesday, December 21, 2011
Season's Greetings Card
designed by Sheri Willshire


We'll be back with more Paper Blossom Poinsettia's and other Holiday projects using the complete line of McGill Paper Punches.
Sign up to follow us on the blog and or like us on facebook so you don't miss out on the blog posts, updates, prizes etc.

McGill Paper Punches:
-95903 2.5" Square Stacking Punch
Additional Supplies:
-Brown Cardstock
-My Mind's Eye - Lost and Found Collection - Blush
-Stampin' Up Chocolate Chip Ink
-Papertrey Ink Edgers 3 Die
-Papertrey Ink
-Recollection Gems
Creating the Poinsettia:
click for full printable pdf
Project Instructions:
- Create Poinsettia as instructed above. Add glitter to edges and set aside for glitter to set.
- Cut brown cardstock to 4 1/4 x 11. Score at 5 1/2. Fold in half to create your card base
- Cut patterned paper to 4 1/2 by 3 3/4.
- Cut another piece of patterned paper to 2 1/2 by 3 3/4. Adhere to the bottom of the first piece of patterned paper. Die cut one end with the edgers die.
- Stamp sentiment on the bottom of the patterned paper.
- Cut a strip of patterned paper to 2 x 5. Using the Square punch at an angle, punch the ends of the strip and adhere to the card.
- Embellish with the glittered McGill Poinsettia.
Here are a couple close up photos...


Be sure to leave a comment on every post this week to be entered in a drawing for our Noel Album Giveaway. See HERE for more info...
We'll be back with more Paper Blossom Poinsettia's and other Holiday projects using the complete line of McGill Paper Punches.
Sign up to follow us on the blog and or like us on facebook so you don't miss out on the blog posts, updates, prizes etc.
Monday, December 19, 2011
Pine Cone Gift Box, Winner and New Giveaway
designed by Jessica Morales

McGill Paper Punches:
-64503 Floral Petals Punch
-64500 Alpine Snowflake Punch
-92086 Pine Punch
-65900 Molding Mat
-65800 Tool Kit
Additional Supplies:
-Kraft Gift Box
Creating the Pinecone:
 click for full printable pdf
This week we would like to giveaway one of our Noel Word Albums. (photo is of our Merry Album)
 All you have to do is leave a comment as well as send a friend over to follow us either on our blog our facebook page. Be sure to have them say who sent them over. To get your name in the drawing more then once all you have to do is leave a comment on each post this week. We look forward to reading all your comments and hope you enjoy what we have to share with you... We will have 3 other prizes for each week in December so we hope you will continue to join us for all the prizes and projects we have to offer.
Now on to the winner of the Green Card Kit....
Debc06 said...Love this tag. Just discoverd you via Kinderstamp0. following you on FB and the blog
Debbie

McGill Paper Punches:
-64503 Floral Petals Punch
-64500 Alpine Snowflake Punch
-92086 Pine Punch
-65900 Molding Mat
-65800 Tool Kit
Additional Supplies:
-Kraft Gift Box
-Brown and Cream Bazzill Cardstock
-Anna Griffin Pattern Paper
-Seam Binding
-Twine
-Pop Dots
-Fabri-Tac
Creating the Pinecone:
This week we would like to giveaway one of our Noel Word Albums. (photo is of our Merry Album)

Now on to the winner of the Green Card Kit....
Debc06 said...Love this tag. Just discoverd you via Kinderstamp0. following you on FB and the blogDebbie
Friday, December 16, 2011
Poinsettia Ornament
designed by Elisa Kammerdiener

McGill Paper Punches:
-64511 Paper Blossoms Star Lily Punch
-64535 Paper Blossoms Crystal Punch
-65800 Tool Kit
Creating the Poinsettia:
We'll be back with more Paper Blossom Poinsettia's and other Holiday projects using the complete line of McGill Paper Punches.
Sign up to follow us on the blog and or like us on facebook so you don't miss out on the blog posts, updates, prizes etc.

McGill Paper Punches:
-64511 Paper Blossoms Star Lily Punch
-64535 Paper Blossoms Crystal Punch
-65800 Tool Kit
Additional Supplies:
-Vintage book pages
-Bazzill Smoothie Green Cardstock
-Queen and Company Pink Gems
-May Arts Ribbon
-Martha Stewart Glitter
-Glass Ornament
-Beacon Fabri-tac Adhesive
Creating the Poinsettia:
click for full printable pdf
Project Instructions:
- Glitter the inside of your ornament
- Create Poinsettia as instructed above. Adhere to Ornament
- Punch out 2-3 Pine Branches and adhere to ornament
- Embellish the Poinsettia with Gems
- Tie a bow around the ornament.
- Add ribbon to the top of the ornament to hang on your tree.
Be sure to leave a comment on every post this week to be entered in a drawing for our Green Card Kit Giveaway. See HERE for more info...
We'll be back with more Paper Blossom Poinsettia's and other Holiday projects using the complete line of McGill Paper Punches.
Sign up to follow us on the blog and or like us on facebook so you don't miss out on the blog posts, updates, prizes etc.
Wednesday, December 14, 2011
Christmas Tag featuring The Pine Cone
designed by Sheri Willshire

McGill Paper Punches:
-64503 Floral Petals Punch
-64500 Alpine Snowflake Punch
-92095L Dimensional Flourish Punch
-53700 5/16" Round 2 inch Reach Punchline
-65900 Molding Mat
-65800 Tool Kit
Additional Supplies:
-Bo Bunny Blitzen Card Stock
-Ranger Ink Kraft Tag
-Tim Holtz Distress Ink
-Ranger Paint Dabber - Snow Cap
-Tim Holtz Distress Stickles
-Ranger Foil Sheet
-Teresa Collins Lace Ribbon
-Seam Binding
-Swarovski Crystals
-Beacon's Fabric Tac Adhesive
-Beacon's 3 in 1 Adhesive
Creating the Pine Cone:
click for full printable pdf
Project Instructions:
Here are a few close up photos:


Be sure to leave a comment on every post this week to be entered in a drawing for our Green Card Kit Giveaway. See HERE for more info...
We'll be back with more Paper Blossom Poinsettia's and other Holiday projects using the complete line of McGill Paper Punches.
Sign up to follow us on the blog and or like us on facebook so you don't miss out on the blog posts, updates, prizes etc.

McGill Paper Punches:
-64503 Floral Petals Punch
-64500 Alpine Snowflake Punch
-92095L Dimensional Flourish Punch
-53700 5/16" Round 2 inch Reach Punchline
-65900 Molding Mat
-65800 Tool Kit
Additional Supplies:
-Bo Bunny Blitzen Card Stock
-Ranger Ink Kraft Tag
-Tim Holtz Distress Ink
-Ranger Paint Dabber - Snow Cap
-Tim Holtz Distress Stickles
-Ranger Foil Sheet
-Teresa Collins Lace Ribbon
-Seam Binding
-Swarovski Crystals
-Beacon's Fabric Tac Adhesive
-Beacon's 3 in 1 Adhesive
Creating the Pine Cone:
Project Instructions:
- Create small Pine Cones as instructed above.
- Edge Pine Cone with Ranger Paint Dabber in Snow Cap. Add Distress Stickles to the edges. Set aside to dry.
- Trim Pattern paper to fit Kraft Tag and adhere together. Punch hole in top of tag.
- Ink the edges of the tag with Distress Inks
- Adhere Pine Cones to the bottom of the tag.
- Punch several Pine Branches, edge with Ranger Paint Dabber in Snow Cap. Once dry
- Tuck the Pine Branches around the Pines Cones, after dipping into adhesive.
- Adhere Foil Sheet to card stock and punch out Alpine Snowflakes and Flourishes. Adhere to the tag.
- Glue crystal to the tag with Beacon's Fabric Tac.
- Tie bow to the top of the tag
Here are a few close up photos:

Be sure to leave a comment on every post this week to be entered in a drawing for our Green Card Kit Giveaway. See HERE for more info...
We'll be back with more Paper Blossom Poinsettia's and other Holiday projects using the complete line of McGill Paper Punches.
Sign up to follow us on the blog and or like us on facebook so you don't miss out on the blog posts, updates, prizes etc.
Tuesday, December 13, 2011
Merry Christmas Tag
designed by Elisa Kammerdiener

McGill Paper Punches:
-64511 Paper Blossoms Star Lily Punch
-64535 Paper Blossoms Crystal Punch
-65800 Tool Kit
-65900 Molding Mat
Creating the Poinsettia:
We'll be back with more Paper Blossom Poinsettia's and other Holiday projects using the complete line of McGill Paper Punches.
Sign up to follow us on the blog and or like us on facebook so you don't miss out on the blog posts, updates, prizes etc.

McGill Paper Punches:
-64511 Paper Blossoms Star Lily Punch
-64535 Paper Blossoms Crystal Punch
-65800 Tool Kit
-65900 Molding Mat
Additional Supplies:
-Bazzill Smoothie Cardstock
-Queen and Company Gold Pearls
-May Arts Ribbon and Twine
-Tim Holtz Distress Ink
-Hero Arts Background Stamp
-Studio G Sentiment Stamp
-Tim Holtz Tag Die
-File Folder
-Beacon Fabri-tac Adhesive
Creating the Poinsettia:
click for full printable pdf
Project Instructions:
- Create Poinsettia with directions above
- Die Cut Tag out of file folder
- Stamp Tag with Distress Ink
- Stamp Sentiment on Tag
- Add ribbon to tag and tie around base with twine.
- Adhere Poinsettia to tag with Fabri-Tac
Be sure to leave a comment on every post this week to be entered in a drawing for our Green Card Kit Giveaway. See HERE for more info...
We'll be back with more Paper Blossom Poinsettia's and other Holiday projects using the complete line of McGill Paper Punches.
Sign up to follow us on the blog and or like us on facebook so you don't miss out on the blog posts, updates, prizes etc.
Monday, December 12, 2011
Spread some Holiday Cheer, Winner and New Giveaway...
designed by Jessica Morales

McGill Paper Punches:
-64503 Floral Petals Punch
-64500 Alpine Snowflake Punch
-92086 Pine Punch
-92022 Dimensional Tree Branch
-65900 Molding Mat
-65800 Tool Kit
Additional Supplies:
-Kraft Cardstock
Creating the Pinecone:
click for full printable pdf
This week we would like to giveaway one of our Green Card Kits.
 All you have to do is leave a comment as well as send a friend over to follow us either on our blog our facebook page. Be sure to have them say who sent them over. To get your name in the drawing more then once all you have to do is leave a comment on each post this week. We look forward to reading all your comments and hope you enjoy what we have to share with you... We will have 3 other prizes for each week in December so we hope you will continue to join us for all the prizes and projects we have to offer.
Now on to the winner of the Red Card Kit....
wanda50 said...
Ummmmmm...I love red! Thanks Janine Blackwelder.

McGill Paper Punches:
-64503 Floral Petals Punch
-64500 Alpine Snowflake Punch
-92086 Pine Punch
-92022 Dimensional Tree Branch
-65900 Molding Mat
-65800 Tool Kit
Additional Supplies:
-Kraft Cardstock
-Brown and Cream Bazzill Cardstock
-Anna Griffin Pattern Paper
-Seam Binding
-Brads
-Pop Dots
-Fabri-Tac
Creating the Pinecone:
This week we would like to giveaway one of our Green Card Kits.

Now on to the winner of the Red Card Kit....
wanda50 said...Ummmmmm...I love red! Thanks Janine Blackwelder.
Friday, December 9, 2011
Poinsettia Gift Box
by Elisa Kammerdiener

McGill Paper Punches:
-64511 Paper Blossoms Star Lily Punch
-64535 Paper Blossoms Crystal Punch
-92086L Designer Pine Punch
-65800 Tool Kit
-65900 Molding Mat
Creating the Poinsettia:

McGill Paper Punches:
-64511 Paper Blossoms Star Lily Punch
-64535 Paper Blossoms Crystal Punch
-92086L Designer Pine Punch
-65800 Tool Kit
-65900 Molding Mat
Additional Supplies:
-Peterson Arne Glittered Cardstock
-Bazzill Smoothie Cardstock
-Queen and Company Gold Pearls
-Seam Binding
-White Gift Box
-Beacon Fabri-tac Adhesive
Creating the Poinsettia:
click for full printable pdf
Project Instructions:
- Create Poinsettia with directions above
- Tie Bow with Seam Binding and adhere to Gift Box with Fabri-Tac
- Adhere Poinsettia to Gift Box with Fabri-Tac
- Punch 2-3 Pine Branches. Adhere to Gift Box with Fabri-Tac
- Embellish Poinsettia with Pearls.
Be sure to leave a comment on every post this week to be entered in a drawing for our Red Card Kit Giveaway. See HERE for more info...
We'll be back with more Paper Blossom Poinsettia's and other Holiday projects using the complete line of McGill Paper Punches.
Sign up to follow us on the blog and or like us on facebook so you don't miss out on the blog posts, updates, prizes etc.
We'll be back with more Paper Blossom Poinsettia's and other Holiday projects using the complete line of McGill Paper Punches.
Sign up to follow us on the blog and or like us on facebook so you don't miss out on the blog posts, updates, prizes etc.
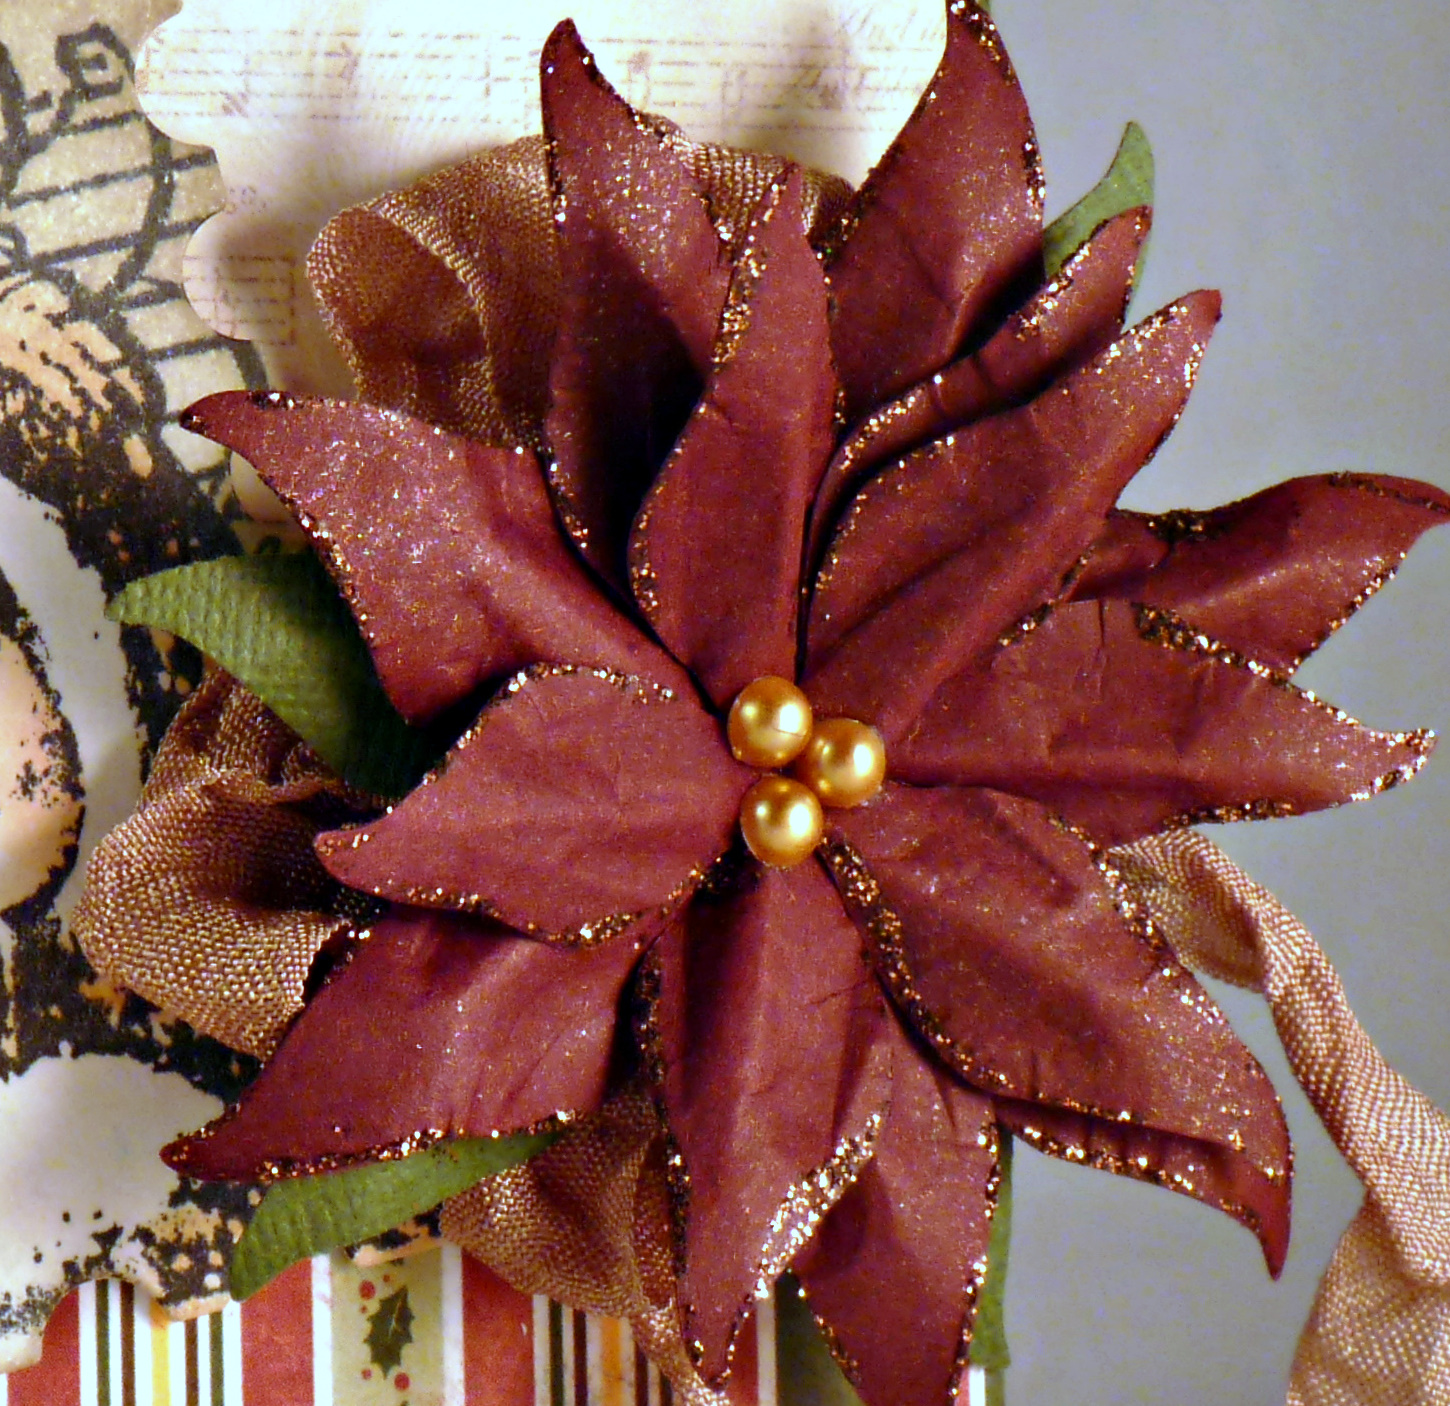
Wednesday, December 7, 2011
Holiday Card featuring the Poinsettia
designed by Sheri Willshire

Mcgill Punches:
-64511 Star Lily Punch
-64510 Crystal Punch
-65800 Tool Kit
Additional Supplies:
-Bo Bunny Father Christmas Patterned Paper Collection
-Bazzill Card Stock
-Stampendous Postal Pair Stamp
-Spellbinders Die
-Copics
-Distress Inks
-Stickles
-Recollections Pearls
-Beacons 3 in 1 Adhesive
-Beacons Fabric Tac
Creating the Poinsettia:
Project Instructions:
Here is a close up photo of the Poinsettia

Sign up to follow us on the blog and or like us on facebook so you don't miss out on the blog posts, updates, prizes etc.

Mcgill Punches:
-64511 Star Lily Punch
-64510 Crystal Punch
-65800 Tool Kit
Additional Supplies:
-Bo Bunny Father Christmas Patterned Paper Collection
-Bazzill Card Stock
-Stampendous Postal Pair Stamp
-Spellbinders Die
-Copics
-Distress Inks
-Stickles
-Recollections Pearls
-Beacons 3 in 1 Adhesive
-Beacons Fabric Tac
Creating the Poinsettia:
click for full printable pdf
Project Instructions:
- Cut Cardstock to 5 1/2 by 8 1/2. Score at 4 1/4 and fold in half.
- Cut Pattern Paper to 5 1/4 by 4. Wrap seam binding around the front of the Pattern paper and adhere on the back side. Tie a bow and adhere with Beacons Fabric Tac Adhesive.
- Stamp image on cardstock. Die cut your image for a decorative edge.
- Color your image with Distress Inks, markers or water colors. Adhere to card with Pop Dots Adhere Poinsettia following the instructions above.
- Embellish your Poinsettia with glitter and pearls.
Here is a close up photo of the Poinsettia
Be sure to leave a comment to be entered into the Red Card Kit Giveaway for this week. The more comments you leave the more your name gets entered. You can read all about it HERE.
We'll be back with more Paper Blossom Poinsettia's and other Holiday projects using the complete line of McGill Paper Punches.
Sign up to follow us on the blog and or like us on facebook so you don't miss out on the blog posts, updates, prizes etc.
Monday, November 28, 2011
Poinsettia Paint Brush Ornament
by Jessica Morales

Sign up to follow us on the blog and or like us on facebook so you don't miss out on the blog posts, updates, prizes etc.

McGill Paper Punches:
Additional Supplies:
-Bazzill Cardstock
-Bazzill Glittered Cardstock
-KinderStampO Vintage and Traditional Holiday Stamp Set
-Ranger Paint Dabbers (Snowcap White, Red Pepper, Bottle)
-Stampin Up Ink (Ruby Red)
-Seam Binding
-Hemp Cord
-Michaels Pearl Spray
-Paint Brush
Creating the Poinsettia:
click for full printable pdf
We'll be back with more Paper Blossom Poinsettia's and other Holiday projects using the complete line of McGill Paper Punches.
Sign up to follow us on the blog and or like us on facebook so you don't miss out on the blog posts, updates, prizes etc.
Subscribe to:
Posts (Atom)