Wednesday, March 30, 2011

Thank You Card

by Elisa Kammerdiener


McGill Paper Punches and Tools:
     -64532 Geranium Leaf Paper Blossoms Punch
     -64530 Geranium Small Leaf Paper Blossoms Punch
     -64534 Grape Leaf Paper Blossoms Punch
     -64535 Highland Snowflake Paper Blossoms Punch
     -65800 Tool Kit
     -65900 Molding Mat

Additional Supplies:
     -Bazzill Smoothie Cardstock
     -Kraft Cardstock
     -Bazzill Bling Cardstock
     -DCWV Pattern Paper
     -Unity Stamp
     -May Arts Ribbon
     -Ranger Perfect Pearls "gold"
     -Ranger Mini Mister
     -Water

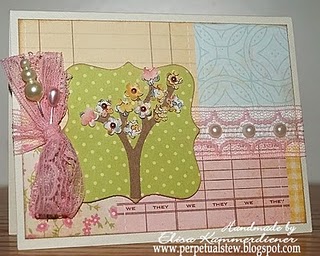
To add some shimmer to the flower you can either spray it with any colored Spritz that you may have in your stash or you can create your own Spritz.  Simply fill a Mini Mister 1/2 full with water and add 1/4 teaspoon of Perfect Pearls to your water.  Shake it up and spritz away.  This will give you a very light shimmer.  If you want more color add a few drops of Tim Holtz Re-Inkers to the Water and Perfect Pearls mix. The more drops you add the more darker your color will be.  Blue Re-inker and Gold Perfect Pearls make a gorgeous combo.

The flower on this card is a little peek into April's Flower of the Month.  Can you guess what flower this is?

If you are local to me or in the Washington area. I will be teaching Flower of the Month classes at several different stores.  See my blog for Dates, Locations and more information on where and how to sign up. 

As always we would love to see what you are doing with McGill Punches so be sure to leave us a comment with a direct link to your project.

Till next time, Happy Crafting.

Monday, March 28, 2011

Happy Spring Card

by Sue Eldred


McGill Paper Punches:
     -64503 Paper Blossoms Floral Petals
     -64500 Paper Blossoms Alpine Snowflake
     -65800 Paper Blossoms Tool Kit
     -65900 Paper Blossoms Molding Mat


Additional Supplies:
     -3 Bugs in a Rug Pattern Paper
     -Bazzill Cardstock
     -Foam Dots

Creating the Begonia:
click to view full printable pdf

This card is part of Sue's Paper Blossoms class that she is teaching next month at Scrapadoodle in Peoria Illinois. If you live in Illinois or are near and want to learn how to create Paper Blossoms be sure to check out the dates, times and contact the store for more details or to sign up.

We would like to see what you have been creating with McGill punches so be sure to leave us a comment and link us up with your projects.

Till next time, Happy Crafting.

Friday, March 25, 2011

Butterfly Card and a Winner

by Elisa Kammerdiener


McGill Paper Punches:
     -92088L Dimensional Butterfly
     -92022 Dimensional Tree Punch

Additional Supplies:
     -Jenny Bowlin Pattern Paper
     -Bazzill Cardstock
     -Kaiser Crafts Black gems
     -Jenny Bowlin Red Pearls
     -Offray Ribbon
     -Foam dots
     -Beads and Wire Michaels wedding section

The little flower from the Dimensional Tree punch was used in the center of each butterfly. Layer 2 wings on top of one another. Curve up your butterfly wings to add more dimension. 

We want to thank each of you for taking the time to check out our blog and leave us a little comment.  We will be doing more giveaways on our punches and we are always updating our blog with great projects so be sure to check back often.  Now on to our first random winner. 

Kathy said...
Well your blog is fantastic!I signed up to follow you as well. I just found you and I do have several Mcgill punches though they are years old-I still use them a lot. But I do not have one butterfly punch-this one is awesome! I'd love, love to win it:)
Congrats Kathy please e-mail me your mailing address at ElisaK12@gmail.com

Till next time,  Happy Crafting.

Wednesday, March 23, 2011

Springtime Tree Card

by Elisa Kammerdiener


McGill Paper Punches and Tools:
     -92022 Dimensional Tree Punch
     -92092L Large Fancy Square Stacking Punch
     -65800 Tool Kit
     -65900 Molding Mat


Additional Supplies:
     -The Girls Paperie Pattern Paper
     -Bazzill Cardstock
     -Kaiser Crafts Pearls
     -Maya Road Pins
     -ColorBox Ink (creamy brown)
     -Vintage Pink Lace

Creating The Tree
Start by punching out your tree with a brown cardstock for the trunk.  Now take pattern paper and punch the flower part of the punch out several times.  Ink all edges if you like.  Place your flowers on top of your molding mat pattern side up. Press down with the 5mm ball stylus and move it around in small circular motions which will start to soften and curl your pattern paper.  Punch out a large fancy square and apply your tree trunk to it.  Now start adding your flowers to your tree.  Embellish your tree with some small pearls.  Add to your card.

You still have time to get in on our Dimensional Butterfly Punch Giveaway.  Just leave us a comment on this post by midnight Thursday March 24. If your a follower of our blog and or facebook please let us know and we will add you in twice for the giveaway.  If not yet a follower sign up today.

Till next time, Happy Crafting

Monday, March 21, 2011

Thinking of you card

by Elisa Kammerdiener 


McGill Paper Punches
     -92088L Dimensional Butterfly
     -92095L Dimensional Flourish
     -65800  Paper Blossoms Tool Kil
     -65900  Paper Blossoms Molding Mat

Additional Supplies
     -The Girls Paperie Pattern Paper
     -Vintage Italian Pattern Paper (butterfly)
     -Core'dinations Glitter Cardstock
     -Bazzill Cardstock
     -Jenny Bowlin Scalloped die cut
     -Tsukineko Ink
     -Queen & Co. Pearls
     -American Crafts Rub-ons
     -Satin ribbon

Creating The Butterfly
Punch pattern paper twice one way and flip the paper over and punch two more times.  This will give you the right and left side wings.  Place your wings onto the molding mat pattern side up.  Press down with the large 8mm ball stylus and move it around in small circular motions which will soften and curl up your paper.  Start layering your wings on top of each other to create your dimensional butterfly. Add the butterfly body and embellish with pearls.

We would love to know what you think of our blog, projects and of course our punches.  So if you leave us a comment on this post by midnight PST Thursday March 24th we will enter your name into a drawing to win the McGill Dimensional Butterfly punch.  If you become a follower to our blog and or facebook page we will enter your name in twice.  Just let us know if your a follower when you leave a comment. 


Our Dimensional Butterfly punch will allow you to create over a dozen different butterflies depending on how you layer each butterfly. 

As always we would love to see any projects that you have created with McGill Paper Punches so please leave a comment with a link to your project. 

Till next time, Happy Crafting!


Friday, March 18, 2011

Decorated Birdhouse

by Janine Blackwelder


McGill Punches:
     -92095 Dimensional Flourishes
     -92089 Dimensional Birds
     -92088 Dimensional Butterflies
     -81013 Silhouette Flower
     -81014 Silhouette Butterfly
     -92085 Designer Leaves
     -64004 Paper Blossoms Buttercup
     -64006 Paper Blossoms Baby Blooms
     -64007 Paper Blossoms Petite Petals
     -64005 Paper Blossoms Star Flower

Additional Supplies:
     -My Minds Eye Pattern Paper
     -Bazzill Cardstock
     -Kaiser Craft Bird House
     -Ink (brown and black)
     -Hero Arts "Big Circle" Stamp set
     -Zig Black Marker
     -Plaid Craft Paint "Fresh Foliage"
     -Hero Arts Clear Gems
     -3M Foam mounting tape
     -Green Floral Foam and Floral wire
     -Acrylic Block
     -Sponge Applicator
     -Extra Fine Grit Sandpaper
     -Paint brushes
     -Scissors

Sand and cover the birdhouse with pattern papers.  Sand and paint edges of any wood trim that is exposed like the rooftop and the shelf.  Ink around the edges for a more distressed look.  Add punched Birds, Butterflies and flourishes to the birdhouse.  To add some more dimension to your birdhouse try bending a few of the Butterfly wings up as if they were in flight.  Fold a Butterfly in half to make it look as if it has landed.  Layer the different flower shapes to create  more interesting flowers.  Add some floral foam to the window box and then add some floral wire to back of your flowers and push the wire into the window box.  Continue to embellish the birdhouse as you wish.  These really make fun home decor pieces and will be a great addition to any room.

As always we would love to see any projects you have created using McGill Inc. Paper Punches. 

Till next time, Happy Crafting.

Wednesday, March 16, 2011

Butterfly Card and Gift Tag


McGill Punches:
     -81014 Silhouette-Butterfly
     -95950 Scallop Circle
     -95923 Stacking Circle
     -53200 Punchline-2 Reach 1/16"

Additional Supplies:
     -Pattern Paper (3 different patterns)
     -Cardstock (3 different coordinating shades)
     -Violet Ink
     -Craft Sponge or Ink Applicator
     -Purple Craft Wire
     -Adhesive of Choice
     -Foam Mounting tape
     -Scissors
     -Pencil

Instructions:

Gift Tag
  1. Trim cardstock to 31/2 x 7 and fold in half.
  2. Trim pattern paper to 3 1/4"x3 1/4" and center onto gift tag.
  3. Punch one Scalloped Circle from pattern paper and punch a hole in the center with the 1/16" punchline punch.  Ink sponge or Ink Applicator with ink and apply to the scalloped edges.  Adhere to center of the card using foam mounting tape.
  4. Punch three Silhouette-Butterflies from different color cardstock and pattern paper. Ink all the edges of pattern paper butterfly.  Cut the body from the wings from one of the cardstock butterflies and ink the edges. Adhere it to the center of the pattern paper butterfly.
  5. Cut two 3" pieces of craft wire and wrap one end of each piece around the tip of a pencil to create a circle.  Adhere to the back of the pattern paper butterfly with foam mounting tape and then adhere it to the other cardstock butterfly.  Adhere your dimensional butterfly to the center of the card with foam mounting tape. 
Card
  1. Trim and mount pattern papers to the center of your card front.
  2. Follow Gift Tag instructions to add the butterflies and scallop circle.
  3. Punch 1 Silhouette Butterfly, fold in half and mount to edge of scalloped circle as if the Butterfly has landed on it. 

Monday, March 14, 2011

Springtime Decorated Box


McGill Supplies:
81013 Flower Silhouette Punch
81014 Butterfly Silhouette Punch
92085 Leaves Punch 
64004 Paper Blossoms Buttercup Punch

Additional Supplies:
     -Pattern Paper (3 different patterns)
     -ColorMates Cardstock (several different colors)
     -Hero Arts "Card Messages" Clear Stamps
     -Bazzill Green dashed ribbon
     -Clear & Gold Gems
     -May Arts Silver Cord
     -Flower Soft Silver stickers
     -3M Foam mounting squares
     -Your favorite Adhesive
     -Box to alter

Instructions:
  1. Cover inside and outside of box with pattern paper
  2. Cut 2 complimentary patterned papers in staggered sizes to layer over box top and adhere
  3. Cut smaller rectangle of paper to stamp or print sentiment. Adhere to center of box top.
  4. Add outlines to each paper layer with silver border stickers
  5. Punch Silhouette - Flower and Paper Blossoms- Buttercup shapes using patterns and solid cardstock
  6. Layer Flower shapes over solid Buttercup shapes with Foam Mounting Tape to add dimension. Embellish with gems.
  7. Punch Designer - Leaves out of green cardstock and adhere to back of flowers.  Attach loops of silver cord to embellish.
  8. Arrange flowers around sentiment and adhere with foam tape.
  9. Punch Silhouette - Butterfly several times with various shades of cardstock.  Fold wings up and adhere one on top of another with foam mounting tape.
  10. Fold one butterfly and crease in half and attach near a flower as if it has landed on the flower. 
  11. Embellish with ribbons and gems.


We would love to see your projects using McGill Punches.  Just leave us a comment with a link to your project.  As always Happy Crafting.


Wednesday, March 9, 2011

Pansy Birthday Card

by Sue Eldred

 
Paper Blossoms Tools
64503 Floral Petals
64500 Alpine Snowflake
64502 Birch Leaf
65800 Tool Kit
65900 Molding Mat

Additional McGill Punches
     - 53700 5/16"  Hole Punch (McGill)
     - 98200 Multi Tags Dimensional Punch (McGill)

Additional Supplies
     - Fabri Tac Glue (Beacon Adhesives)
     - "Always" Pattern Paper (Fancy Pants Designs)
     - Purple Palisades, Lavender Twilight, Witch Hazel, Candlelight
       cardstock (Bazzill)
     - Cream Cardstock
     - 98200 Multi Tags Dimensional Punch (McGill)
     - Versa Magic Chalk Inks: Pretty Petunia, Tea Leaves (Tsukineko)
     - White ColorBox Ink Pad (Clearsnap)
     - PC1008 Violet Prismacolor Pencil
     - Purple Ribbon: approx 8" (May Arts)
     - Self Adhesive Jewels: Desert Sun (Bazzill Basics)
     - Small Cream Button and White String
     - Computer generated font: Bradley Hand 20pt

Instructions:
     Learn to create Pansies with the instruction sheet below

Click instruction sheet for full printable PDF

Card Assembly:
  1. Cut two pieces of "Always" pattern paper. One 3 3/4"x 5" striped side vertically and the other 1 1/2" x 5" Paisley side.
  2. Adhere the paisley strip down the center of the striped layer. Adhere a piece of purple ribbon down the center of the paisley strip.
  3. Adhere layers onto a 4" x 5 1/4" piece of Lavender Twilight and then a 4 1/2" x 5 1/2" card made from Witch Hazel Cardstock.
  4. Glue three Pansies into a cluster on the front of the card.
  5. Print "Happy Birthday" on Cream Cardstock and punch out with Multi Tag punch.
  6. Rub Pretty Petunia ink onto the edges of the tag. Adhere next to your pansies with foam dots.
  7. Fold Purple ribbon into thirds with the ribbon ends out.  Wrap the center of the ribbon a couple of times with the white string to form a bow.  String button to the white string and tie to the front of the bow.  Adhere to top of your card. 
    We would love to see more of your projects using McGill Punches.  Just leave us a comment with a link to your project.  As always Happy Crafting.


    Monday, March 7, 2011

    Diva Craft Lounge and McGill Get Creative

     Craft Diva Danielle and Rayme Royale The Duke of Crafts interview some of their favorite picks at CHA Los Angeles. This week McGill is featured on Diva Craft Lounge. 
    Watch Sue Eldred create a Paper Blossoms Rose with Diva Danielle and Rayme Royal. 
    http://www.divacraftlounge.com/CHA2A.htm

    Thursday, March 3, 2011

    March Flower of the Month


    This month we are all about Tulips. 

    To get you started on creating dimensional Tulips, Sue Eldred has designed this fabulous Pot of Tulips along with a complete list of supplies and instructions.

    Pear 64501
    Alpine Snowflake 64500
    Star Lily 64511
    Starburst 64512
    Tool Kit 65800
    Molding Mat 65900

    If you're new to Paper Blossoms and aren't sure where to start we've got you covered. You'll want to take a look at the Paper Blossoms How-To's section of our blog. It will walk you through the steps to shape each petal and how to assemble the flowers.


    Pot of Tulips
    (click project to view instruction sheet)


    We'll be back soon with more Paper Blossoms projects and other projects using the complete line of McGill Paper Punches.

    Sign up to follow us on the blog and or like us on facebook so you don't miss out on blog posts, updates etc.