Showing posts with label Stacking Punches. Show all posts

Wednesday, January 18, 2012

Mini Valentine Cards

Designed by Sheri Willshire


McGill Paper Punches: 
     -98100 Scallop Multi Tag

Additional Supplies:
     -Patterned Paper
     -Kraft Paper
     -Light Pink, Dark Pink, Pink and Red Cardstock
     -Twine
     -Buttons
     -Computer generated sentiments
     -Light Pink, Dark Pink, Pink and Red Fine Glitter (Martha Stewart)
     -Spray Adhesive
     -Pop Dots
     -Beacons 3 in 1 Adhesive

Project Instructions:
  • Using the Heart Silhouettes and Shadows Punches, punch Hearts Shapes with 4 different shades of card stock. Spray Silhouettes with adhesive. Add glitter. Adhere to the Shadow Heart with pop dots. 
  • Trim 4 pieces of Kraft card stock to 6 x 3. Score at 3" and fold in half. 
  • Trim a piece of patterned paper to a 2 3/4 inch square. Adhere to card front with glue. 
  • Punch 4 Kraft card stock shapes with the Lg. Fancy Square punch . Adhere shape to patterned paper layer. 
  • Adhere Silhouettes and Shadows Hearts to the Lg. Fancy Square shapes 
  • Print Valentine's sentiments. Punch sentiments out with the Scallop Multi Tag Punch.
  • Adhere to card with glue. Add a button with twine. 

Here are a couple more photos...


We'll be back soon with more creative projects using the complete line of McGill Paper Punches.

Sign up to follow us on the blog and or like us on facebook so you don't miss out on the blog posts, updates, prizes etc.

    Tuesday, December 6, 2011

    Ornament

    by Elisa Kammerdiener


    McGill Paper Punches:
         -95921 1.5" Circle Stacking Punch

    Additional Supplies:
         -Vintage Book pages
         -Vintage Glitter Glass
         -Vintage Tinsel
         -Pearl Beads
         -Jump Rings
         -Crystal dangle
         -Glossy Accents
         -Beacon 3 in 1

    Project Instructions:
    • With McGill 1.5" Stacking Circle Punch punch out 7 Circles from Vintage Paper.
    • Fold each circle in half.
    • Adhere each circle half to another circle half with a dab of glue on top and bottom to create a pocket for the bead to sit in.This will create your ornament.
    • Adhere 7 Pearls to the openings in the circles.
    • Trim Vintage Tinsel to approx 6" and slide down the center of the ornament.
    • Apply Glossy Accents to the edges and dip into Vintage Glitter Glass.
    • Loop the bottom end of the Tinsel and add a jump ring and secure your dangle. Twist the Tinsel so it's secure. 
    • Loop the top of the Tinsel and add a jump ring and twist Tinsel secure.  
    Here is a close up photo...
     

    You can use the McGill 1" Stacking Circle punch to create a smaller ornament and connect the two together with a few jump rings or you can even create them bigger with the McGill 2" and 2.5" Stacking Circles.

    These are so easy to create that you can also string these on ribbon, yarn etc. to create a chain or garland for your tree, mantle etc. 

    I  hope you like them and create lots of them... Be sure to link us up if you do.  We would love to see how you use these to decorate your home.

    Be sure to leave a comment on every post this week to be entered in a drawing for our Red Card Kit Giveaway.  See HERE for more info... 

    We'll be back with more Paper Blossom Poinsettia's and other Holiday projects using the complete line of McGill Paper Punches.  

    Sign up to follow us on the blog and or like us on facebook so you don't miss out on the blog posts, updates, prizes etc.

    Tuesday, November 15, 2011

    Peace Card Featuring the Dimensional Angel Punch

    by Janine Blackwelder


    McGill Paper Punches:

    Additional Supplies:
         -Bo Bunny Father Christmas 6x6 Paper Pack
         -Bazzill Cardstock
         -Just for Fun Stamps
         -Tim Holtz Distress Ink (Brushed Corduroy)
         -Rhinestones
         -Ribbon
         -Foam Mounting Tape
         -Glue Pen


    We'll be back soon with more projects using the complete line of McGill Paper Punches.

    Sign up to follow us on the blog and or like us on facebook so you don't miss out on the blog posts, updates, prizes etc.

    Till next time,  Happy Crafting.

    Wednesday, November 9, 2011

    Angel Place Card

    by Sheri Willshire


    McGill Paper Punches:
      
    Additional Supplies:
         -Bo Bunny Blitzen 6x6 Paper Pack
         -Bazzill Cardstock
         -Gold Paint Marker
         -Glossy Accents
         -Recollection Rhinestones
         -Beacon 3 in 1 Adhesive

    Instructions for Angel:
    • Using coordinating paper, punch out the Angel layers 3 times
    • Adhere each of the layers on top of one another.
    • Apply Gold Paint Pen to the wings and stars and adhere to Angel once dry.

    Creating the Place Card:
    • Trim cardstock to 3"x4 1/2". Score at 2 1/2" and fold in half.
    • Round corners with corner rounder.
    • Trim pattern paper to 2 7/8"x2 1/2". Round corners with corner rounder and adhere to the center of card.
    • Using coordinating cardstock, punch the Vintage Label twice. Swap pieces and adhere centers.  Apply name to one and adhere to card. 
    • Adhere the Angel you created from instructions above to the card. 
    • Finish place card by embellishing with rhinestones.

    We'll be back soon with more projects using the complete line of McGill Paper Punches.

    Sign up to follow us on the blog and or like us on facebook so you don't miss out on the blog posts, updates, prizes etc.

    Till next time,  Happy Crafting.

    Tuesday, October 11, 2011

    Altered Halloween Box featuring the Rose

    by Sheri Willshire


    McGill Paper Punches:
         -64503 Paper Blossoms Floral Petals
         -64500 Paper Blossoms Alpine Snowflake
         -92092 Large Fancy Square Stacking Punch
         -65800R Tool Kit
         -65900R Molding Mat

    Additional Supplies:
         -Martha Stewart Score Board
         -Score Tape
         -Teresa Collins Haunted Hallows Paper Pad
         -Bazzill Cardstock
         -Inkadinkado Stamp
         -Zing Embossing Powder
         -Tim Holtz Distress Ink "Spiced Marmalade
         -Fabri-Tac

    Creating the Floral Rose:
          click for full printable PDF

    Here is a close up of the rose.

    We'll be back with more Paper Blossom Roses and other Spooky/Fall projects using the complete line of McGill Paper Punches.

    Sign up to follow us on the blog and or like us on facebook so you don't miss out on the blog posts, updates, prizes etc.

    Till next time,  Happy Crafting.

    Friday, October 7, 2011

    Best Witches Card

    by Janine Blackwelder


    McGill Paper Punches:
         -92096L Ice Cream Cone Dimensional Punch
         -69006 Vintage Label Paper Punch
         -95959 3" Scalloped Circle Stacking Punch
         -95923 2.5" Circle Punch
         -53600 3/16 circle punchline hole punch

    Additional Supplies:
         -Bazzill Cardstock
         -Just for fun Rubber Stamps "Bats"
         -JustRite Stampers Halloween mini sentiments
         -Momento "Tuxedo Black" Ink
         -Scotch Foam Tape
         -Scor-Tape
         -Ribbon
         -Cuttlebug "bubbles" Embossing Folder
         -glitter
         -ScraPerfect "The Best Glue Ever" Adhesive

    Creating the Witch Hat:
    • Punch the Ice Cream Punch and Vintage Label punches from black card stock, then re-punched the open area in card stock with the Vintage Label punch to make the brim of the hat. Glue the Cone shape to the back of the half Oval then glued it to the first black oval. Use a liquid adhesive to outline the brim of the hat then sprinkled it with glitter.

    We'll be back with more Paper Blossom Roses and other Spooky/Fall projects using the complete line of McGill Paper Punches.

    Sign up to follow us on the blog and or like us on facebook so you don't miss out on the blog posts, updates, prizes etc.

    Till next time,  Happy Crafting.

    Friday, September 23, 2011

    Happy Fall Card

    by Janine Blackwelder


    McGill Paper Punches:
         -92033 Dimensional Tree Branch 
         -69006 Vintage Label Punch

    Additional Supplies:
         -Bazzill Cardstock
         -Just for fun rubberstamps (fence)
         -Distress Ink (brushed corduroy)
         -White Ink and Embossing Powder
         -Black Ink
         -Fabri-Tac adhesive
         -Foam tape
         
    We will be back soon with another amazing project featuring McGill Punches but till then... We would love to see what you are creating with any of our McGill Paper Punches so be sure to leave us a comment with a direct link to your project.

    Till next time, Happy Crafting

    Tuesday, September 6, 2011

    A Friendship Card

    by Cristal Hobbs


    McGill Paper Punches:
         -64520 Mini Petals
         -64532 Geranium Leaf
         -69006 Vintage Label Punch
         -65800 Tool Kit
         -65900 Molding Mat

    Additional Supplies:
         -Bazzill Cardstock (Red, Green and Ivory)
         -Jenni Bowlin Pattern Paper
         -Red Tulle
         -Jenni Bowlin Paint dabber 
         -Viva Liquid Pearls
         -1 1/4" and 1" Styrofoam Balls cut in half
         -Fabri-Tac Adhesive

    Creating the Geranium:
          click for full printable PDF

    We will be back soon with another amazing project featuring McGill Punches but till then... We would love to see what you are creating with any of our McGill Paper Punches so be sure to leave us a comment with a direct link to your project.

    Till next time, Happy Crafting

    Thursday, August 25, 2011

    Have a Wonderful Day Card

    by Sheri Willshire


    McGill Paper Punches:
         -81014 Silhouette Butterfly Punch
         -95950 2 7/8 Scalloped Stacking Circle
         -95923 2 1/8 Stacking Circle

    Additional Supplies:
         -Creative Imaginations Pattern Paper
         -Bazzill Kraft Cardstock
         -Seam Binding
         -Recollections Faux Pearls
         -Paper Trey Ink Sentiment (flower fusion #1)
         
    A closer look at the card.

    We will be back soon with another amazing project featuring McGill Punches but till then... We would love to see what you are creating with any of our McGill Paper Punches so be sure to leave us a comment with a direct link to your project.

    Till next time, Happy Crafting

    Tuesday, August 23, 2011

    My Sweet Blossoms Layout

    by Cristal Hobbs


    McGill Paper Punches:
         -92096L Ice Cream Dimensional Punch
         -95950 2 7/8 Scalloped Stacking Circle
         -95923 2 1/8 Stacking Circle
       
    Additional Supplies:
         -Clear Scraps XL Shapes
         -Samantha Walker Unity Stamps
         -Creative Imaginations Kokeshi Papers
         -Clear Snaps Glitter
         -Viva Decor Pearl Pen
         -Beacon Fabri-Tac Adhesive
     
    We will be back soon with another amazing project featuring McGill Punches but till then... We would love to see what you are creating with any of our McGill Paper Punches so be sure to leave us a comment with a direct link to your project.

    Till next time, Happy Crafting 

    Monday, August 22, 2011

    Bloom Blossom Become featuring the Sunflower.

    by Sheri Willshire


    McGill Paper Punches:
         -64511 Star Lily
         -64535 Large Highland Snowflake
         -64533 Sun
         -65800 Tool Kit
         -65900 Molding Mat
         -69006 Vintage Label Punch
         -95901 1.5" Square Stacking Punch (to create the banner ends)

    Additional Supplies:
         -Echo Park Pattern Paper
         -Bazzill Cardstock
         -Paper Trey Ink Stamp Sentiment
         -Paper Trey Ink Die
         -Ink
         -Beacon Fabri-Tac Adhesive

    Creating the Sunflower:
        click for full printable PDF

    Here is another view of the card to show the dimension of the flower.


    We will be back soon with another amazing project featuring McGill Punches but till then... We would love to see what you are creating with any of our McGill Paper Punches so be sure to leave us a comment with a direct link to your project.

    Till next time, Happy Crafting

    Saturday, August 20, 2011

    Happy Birthday Card

    by Janine Blackwelder


    McGill Paper Punches:
         -92096L Ice Cream Dimensional Punch
         -95917 2 1/4 Fancy Square
         -95923 2 1/8 Stacking Circle
         -69006 Vintage Label Punch
         -64510 Crystal Punch

    Additional Supplies:
         -DCWV Birthday Extravaganza Stack
         -Kraft Cardstock
         -Hero Arts Stamps
         -Beacon Fabri-Tac Adhesive
         -Ink 
         -Gems
         -ribbon

    We will be back soon with another amazing project featuring McGill Punches but till then... We would love to see what you are creating with any of our McGill Paper Punches so be sure to leave us a comment with a direct link to your project.

    Till next time, Happy Crafting

    Friday, August 19, 2011

    A Little Treat Just For You!

    by Janine Blackwelder


    McGill Paper Punches:
         -92096L Ice Cream Dimensional Punch
         -95950 2 7/8 Scalloped Stacking Circle
         -95923 2 1/8 Stacking Circle
         -52400 1/8 Punchline Round

    Additional Supplies:
         -DCWV Birthday Extravaganza Stack
         -Kraft Cardstock
         -Woodware USA Stamps
         -Beacon Fabri-Tac Adhesive
         -Ink

    The Punch:


    We would love to see what you are creating with any of our McGill Paper Punches so be sure to leave us a comment with a direct link to your project.

    Till next time, Happy Crafting

    Thursday, August 11, 2011

    Friendship Tag featuring the Vintage Label punch.

    by Jessica Morales


    McGill Paper Punches:
         -64520 Mini Petals
         -69006L Vintage Label Punch

    Additional Supplies:
         -KinderStampO Stamps and charms
         -Tim Holtz Distress inks
         -DCWV Blossom song stack

    We'll be back with more Paper Blossom Sunflowers and other projects using the complete line of McGill Paper Punches.

    Sign up to follow us on the blog and or like us on facebook so you don't miss out on the blog posts, updates, prizes etc.

    Monday, May 16, 2011

    A Silhouette Flower Card

    by Janine Blackwelder


    McGill Paper Punches:
         -81013 Silhouette Flower Punch
         -95950 3" Scalloped Circle Stacking Punch
         -95923 2.5" Circle Stacking Punch
         -92085 1.5" Leaves

    Additional Supplies:
         -Bazzill Cardstock
         -Ink
         -Foam Tape
         -Inking Tool
     
    Card Instructions:
    1. Trim Card Base to 3.5"x7" and fold in half to create 3.5x3.5" card
    2. Trim a colored piece of cardstock or pattern paper to 3.25x3.25" and adhere to center of card base.
    3. Punch out a Scalloped Circle and adhere to center of card
    4. Punch out a Circle, Ink edges and adhere to center of Scalloped Circle.
    5. Punch out two Silhouette Flowers in two different colors of cardstock, ink the edges and layer them using foam tape.
    6. Punch out two Leaves from cardstock flipping one over adhere the leaves to the back of the Silhouette flowers and adhere to your card. 
    We would love to see what you are creating with any of our McGill Paper Punches so be sure to leave us a comment with a direct link to your project.

    Till next time, Happy Crafting

    Monday, April 25, 2011

    Thinking of you Card

    by Janine Blackwelder


    McGill Paper Punches:
         -95906 2" Scallop Square Stacking Punch
         -95901 1.5" Square Stacking Punch
         -95951 2.5" Scallop Circle Stacking Punch
         -95922 2" Circle Stacking Punch
         -98100 Scallop Multi Tag Punch
         -64520 Mini Petals Paper Blossoms Punch

    Additional Supplies:
         -SEI Pattern Paper
         -Bazzill Card Stock
         -Hero Arts Clear Stamps
         -Ranger Glossy Accents
         -Tsukineko Black Onxy Ink
         -Crystal Gem
         -Twine
         -Foam Tape

    Instructions:
    1. Cut cardstock to desired card size
    2. Punch out 4 Scalloped Squares and 4 Squares and stack smaller squares onto scalloped squares.  Adhere them to front of card.
    3. Punch out 1 Scalloped Circle and 1 Stacking Circle and adhere Stacking Circle onto Scalloped Circle.  Punch out 1/8" holes around the scalloped circle and adhere to card.
    4. Punch out Daisy flowers and layer. Add Crystal Gem to center.  Then adhere to card. 
    5. Punch out Tag and stamp sentiment with black ink.  Tie a bow onto tag with twine and adhere to card.
    As always we would love to see what you are creating with any of our McGill Paper Punches so be sure to leave us a comment with a direct link to your project.

    Till next time, Happy Crafting.

    Friday, April 15, 2011

    Flowers In Bloom


    McGill Paper Punches:
         -64510 Crystal Paper Blossoms Punch
         -64533 Sun Paper Blossoms Punch
         -64532 Geranium Leaf Paper Blossoms Punch
         -64530 Small Geranium Leaf paper Blossoms Punch
         -64535 Large Highland Snowflake Paper Blossoms Punch
         -64531 Small Highland Snowflake Paper Blossoms Punch
         -64534 Grape Leaf Paper Blossoms Punch
         -65800 Tool Kit
         -65900 Molding Mat
         -95922 2" Stacking Circle Stacking Punch
         -95951 2.5" Scalloped Circle Stacking Punch
         -81014 Silhouette Butterfly Punch

    Additional Supplies:
         -The Paper Company Shimmer Cardstock
         -Basic Grey Pattern Paper
         -Creative Impressions Pearls
         -Hero Arts Stamp
         -Ink
         -Ribbon
         -Beacon Fabric Tac
         -Pop Dots

    We love that punches in general give you so much freedom when creating and how you can mix and match different collections and shapes together to create an amazing final product.  Janine did just that by showcasing several of our different lines of punches on one stunning card.

    To create the Peony flower click on the How-To section of the blog and click on the Peony instruction sheet.  It will bring up a printable pdf for you to follow along.  The Peony on the card omits the center ball and replaces it with the Crystal and Sun shapes.  Cupping the center of these shapes and applying them to the center of the flower and finishing it off with a pearl center. 

    As always we would love to see what you are creating with McGill Paper Punches so be sure to leave us a comment with a direct link to your project.

    Till next time, Happy Crafting.

    Wednesday, March 23, 2011

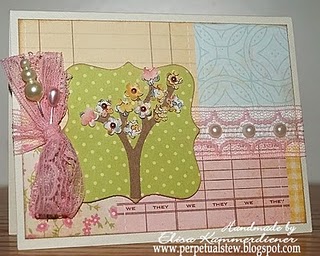
    Springtime Tree Card

    by Elisa Kammerdiener


    McGill Paper Punches and Tools:
         -92022 Dimensional Tree Punch
         -92092L Large Fancy Square Stacking Punch
         -65800 Tool Kit
         -65900 Molding Mat


    Additional Supplies:
         -The Girls Paperie Pattern Paper
         -Bazzill Cardstock
         -Kaiser Crafts Pearls
         -Maya Road Pins
         -ColorBox Ink (creamy brown)
         -Vintage Pink Lace

    Creating The Tree
    Start by punching out your tree with a brown cardstock for the trunk.  Now take pattern paper and punch the flower part of the punch out several times.  Ink all edges if you like.  Place your flowers on top of your molding mat pattern side up. Press down with the 5mm ball stylus and move it around in small circular motions which will start to soften and curl your pattern paper.  Punch out a large fancy square and apply your tree trunk to it.  Now start adding your flowers to your tree.  Embellish your tree with some small pearls.  Add to your card.

    You still have time to get in on our Dimensional Butterfly Punch Giveaway.  Just leave us a comment on this post by midnight Thursday March 24. If your a follower of our blog and or facebook please let us know and we will add you in twice for the giveaway.  If not yet a follower sign up today.

    Till next time, Happy Crafting